Show Your Love Workshop (1/19/19) Recap

Workshop Recap


In case you weren’t able to make it to the workshop on the 19th here are the projects we made.  We had so much fun.  I wanted to use a little more challenging bundles Forever Lovely and Meant To Be.  While these bundles are a little more challenging, they are meant to allow you to make some amazing projects. You just need to learn to use them one time and you’ll be hooked!

I took the most designs from our 2019 Occasions Catalog.  I wanted to make Valentine’s Day cards and incorporate all occasion cards as well.  I think I was able to do that.  Look at the beautiful colors and the great embellishments I used.  So delicate and pretty.

When I say that these bundles are challenging, that is true but only to a certain extent.  If you know how to properly use the Framelits, Thinlits and Edgelits, they’re pretty easy to use. Take a close look at these projects and let me know if you need help using the bundles.  Once you have made your own projects with them, send them to me and I will post them on my Blog.


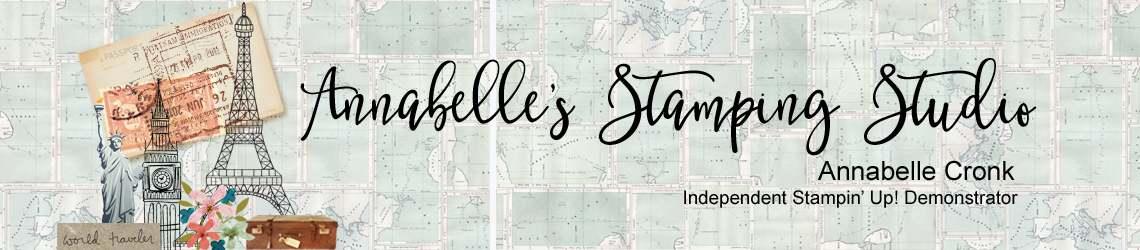
This beautiful Happy Birthday card was so easy to make.  I used the Forever Lovely stamp set for the flowers in the middle and the Happy Birthday word stamp from All That You Are set.  I accented it with All My Love DSP, All My Love Ribbon and the leaves and sprigs were die cut out of the Lovely Flowers Edgelits Dies in Soft Sea Foam card stock. I colored the epoxy accents with the Lovely Lipstick Blends pen. I used Whisper White card stock and Flirty Flamingo card stock which made the card pop!


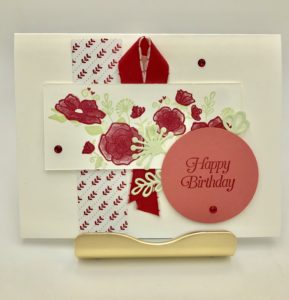
This card is featured in our Occasions Catalog on page 3.  I liked it so much I didn’t have to change it much.  I need so many birthday card and this one especially is so pretty with all the different colors.  I used the All That You Are stamp set and the matching Frosted Bouquet Framelits Dies to cut out the flowers. I used our new color Balmy Blue card stock as well as Balmy Blue ink.  I love that color.  It’s such a perfect blue and so versatile.  I made the ribbon with Night of Navy medium Bakers Twine. Did you notice the Vellum? It’s kind of subtle but adds such a nice accent.  This one was a big hit at the workshop.


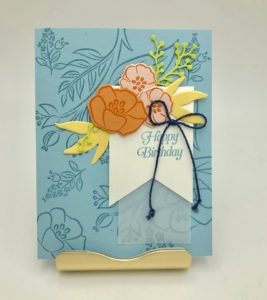
How pretty and elegant is this card? While I have to admit this card need a little TLC while lining up the corner dies, the end result is so pretty. I again used the Forever Lovely Bundle for stamps and Edgelits but I kept the continunity of the card with the All My Love DSP, All My Love ribbon and All My Love cardstock. I especially like the rose on the top left of the center piece of the card.  It’s an Edgelits Die what you put on the corner and it cuts around it and the end result is the rose ends up being a part of the card.  How cool is that?  It’s very easy and so pretty.  I love it.


This card is also featured in the Occasions Catalog on page 4 along with the card above.  Again, I used the Forever Lovely Bundle and all the All My Love Suite of product.  I used Lovely Lipstick color for the roses and dauber technique behind the die cut flowers.  Did you notice how the Edgelits not only cut out the flowers but it also embosses on the edges.  So unique and pretty.  I love the versatility of the All My Love DSP.  I used it on each of these cards and didn’t have to duplicate any of the paper.  One of my new favorite colors is Granny Apple Green, which I used on the leaves.  Soft Sea Foam is a keeper color.  It’s so pretty and unique and not over powering at all.  It adds just the right touch of color with the sprigs. A little secret, I’m giving this one to my husband for Valentine’s Day. I’m not giving anything away as I know he’s on my mailing list for my Blog, but I know he doesn’t read the entire post! Ha!


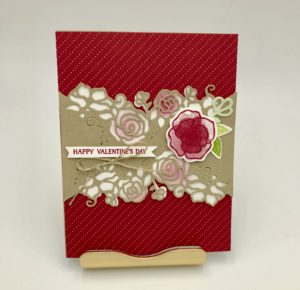
This last card was super easy yet I think it looks like it’s super fussy.  I use the amazing new Lace Dynamic TIEF.  I didn’t even spray it with water before I ran it thought the Big Shot, and look at the dynamic impression it made.  On this card I used the Meant To Be Bundle.  The big take away from this bundle are these cool Framelits Dies.  Not only are they hearts but there are a few stitched hearts and bunched hearts and hearts, hearts, hearts! There are 16 dies total in the set and they can be used to make a variety of cards, not only Valentine’s Day cards.  You can get really creative with this bundle.  I used Calypso Coral and our new Grapefruit Grove cardstock to put this card together.  I added a pop of color with the yellow (Daffodil Delight) rose. I used the Calypso Coral Blends to color the clear epoxy accents.


Product List

For all the projects

Don’t miss out on the next workshop! All the details are listed below and consider this your invitation to join me.


February Workshop

From Basic to Beautiful


The theme of February’s workshop this year is how to take your projects from basic to beautiful.  What does that mean? Well maybe you’ve just started stamping and you’re ready to step your work up a bit.  We’ll be making some cards that use some basic techniques, but we’re going to step it up a bit by adding some simple techniques to make your cards absolutley beautiful.  The recipient of your projects will be wowed by your work.  It really isn’t difficult, it’s all in what you have and knowing how to use the items you already have.


DATE: Saturday February 16, 2019

TIME: 12 Noon to 5:00 pm

PLACE: Annabelle’s Stamping Studio, 3300 Granada Circle, Brea

COST: $28 ($23 for my downline)

Cost Includes: All materials to make 5 projects (except adhesive), Lunch, Snacks, Drinks and Door Prizes.

BRING A FRIEND: Bring a friend (new to my workshops) and get $5 off your class fee.

RSVP: Please RSVP by Thursday February 14 to reserve your spot.  Class limited to 12.

If you aren’t able to make it to the workshops but you’d like to have the projects we make, you can buy the class kits of each of the projects for $3 ea.  Please let me know by February 14 if you’d like to buy the kits. Likewise, If  you can’t make it to the workshop but you’d like to place an order, you can shop online 24/7 at my online shop @ www.annabellesstampingstudio.com Link in this post. If you order online your order will go directly to you.  Please use Hostess Code DYSRUJJQ and your order will be included in February’s workshop.

Note: Please bring your Workshop Stamp Kits. If you are low or out of adhesive, I have a variety of adhesives for you to purchase at the workshop. I accept cash, check, PayPal or Venmo for your class fee and class purchases (If you are paying your class fee by PayPal or Venmo, you must pay 2 days in advance).  You can pay by credit card M/C, VISA and AMEX when I place your order through Stampin’ Up!

Would you like an Annual Catalog, 2019 Occasions Catalog or Sale-a-Bration Brochure? Let me know and I will get one to you right away.  Remember Sale-a-Bration goes until March 31, 2019 and the Occasions Catalog and Annual Catalog are good until June 4, 2019.

Note: My PayPal link is apcronk@gmail.com and my Venmo name is Annabellecronk


SHOW YOUR LOVE – WORKSHOP

FIRST WORKSHOP OF 2019!


Can you believe it’s already 2019? It’s crazy! Well we must start the New Year out right by gathering for our very first stamping and paper crafting workshop.  I want to share a little bit about what we’re going to go over at the workshop and what we’ll be working on.  First, I want to welcome my first recruit of 2019! Darshana Patel.  Some of you know Darsh from past workshops. She told me she’s had a real desire to be a hobby demonstrator for a while and finally decided to take the plunge.  Join me in welcoming Darsh.  Hopefully she’ll be able to make it to the workshops in 2019.

The next big announcement is the all new 2019 Occasions Catalog and our annual Sale-a-Bration promotion! Everyone who attends the workshop on January 19, will get their copies of each catalog.  If you can’t make it to the workshop, please contact me and I will get you your copies right away. The Occasions Catalog runs from January 3, 2019 to June 30, 2019.  Sale-a-Bration runs from January 3, 2019 to March 31, 2019. The highlight of the two is of course Sale-a-Bration.  Why? Because you earn FREE product and you can earn in 3 different ways. 1) For every $50 you spend (retail w/o s&t) you earn free product from the Sale-a-Bration Brochure. 2) When you Host your own workshop ($150 or more) you earn your hostess dollars AND Sale-a-Bration product as well. 3) When you Join My Team you earn $50 more product in your kit. Another great thing is, we now have 2 levels to give you more choices. The selection this year is versatile and Stampin’ Up! has given us a greater variety to choose from. Don’t miss out on this annual promotion, you won’t be disappointed. Visit my website through this post and you can see the catalogs online!


DETAILS FOR THE WORKSHOP!


The theme of the workshop will be Valentine’s Day and all occasion cards.

DATE: January 19, 2019

TIME: 12 Noon to 5:00 pm

COST: $28 ($23 for my team)

INCLUDES: The cost for the workshop includes all materials (except adhesive) to make 5 projects. Lunch is provided including iced tea, bottled water and dessert and snack. Also included are door prizes (5 prizes total)

PLEASE RSVP BY: January 16, 2019 by text @ 714-401-4054, email: annabelle@annabellesstampingstudio.com, by the “Contact Me” form on www.annabellesstampingstudio.com

PLEASE NOTE:

If it is your first time attending my workshop, adhesive will be provided for you. You will be given a “Workshop Guidelines” hand out which outlines what you need to build your Workshop Stamping Kit which you will bring with you each time you attend thereafter.

At every workshop I need a little help with door prizes (time keeper) and photography (2 people).  If you would like to help with either of these your name will be added twice to the Decide App, giving you a better chance of winning. Please let me know when you get here and I will hand that over to you. If you are the photographer, please try and take posed pictures showcasing our projects.  Candid shots are always fun but we want to make sure “it’s our best shot” as they will be posted on Social Media.  If you do not want your picture taken and posted on Social Media, please let the photographer know ahead of time.


DON’T FORGET!!!!!


Tomorrow January 10, 2019 is the last day to activate your Paper Pumpkin code if you’d like to get the January kit.  It will be a Valentine’s Theme project.  The 10th of every month is the last day to purchase, unsuspend, or activate your account for Paper Pumpkin. I’m so excited for this month’s kit.  We’ve gotten some hints and it looks so cute.


FAST FUSE PROMOTION CLOSED!

FAST FUSE PROMOTION

IS OVER!


Just as I figured the Fast Fuse Promotion that was supposed to go for 5 days, has ended!  I’m hoping that you got in before the they sold out.  I know I’m always emphasizing “While Supplies Last” and I do that because I know that things like this will happen and I don’t my customers to miss out.

I did order extras, so if you’d like some please let me know ASAP because it’s First Come First Served with my supply. The total cost is $11.85 with shipping and tax. $10 Fast Fuse, $1 shipping, $0.85 tax = $11.85 (You get 1 Fast Fuse and 2 FREE REFILLS).

I got a notice that they have already shipped, so they should be here by Monday next week.  If you did order from me here are your totals:

1 Fast Fuse Cartridges (w/2 free refills) = $11.85

2 Fast Fuse Cartridges (w/4 free refills) = $23.70

3 Fast Fuse Cartridges (w/6 free refills) = $35.55

You can pay me directly through PayPal, check or cash. For those of you who ordered and are coming to the workshop on Saturday, you can pay me then.

Thank you all who participated in this promotion, I know you’re going to love using Fast Fuse.  There is a little trick in using it so I will be doing a FB Live video in the next couple of days on how to properly use it.  Unless you know how to properly use it, please don’t try to use it like Snail because it doesn’t work the same way and you’ll be disappointed and I don’t want that to happen. I want you to get the most benefit from your product by using it correctly.


STAMPARATUS

IS ALMOST HERE!


We got a notice last week that the first round of Stamparatus is almost ready to ship.  If you have reserved a Stamparatus with me back in November, you are in this first round to receive your Stamparatus.

The email noted that they will begin shipping next Friday February 16. Yay! I’m so excited to get my hands on it.

I will be sending out an email to those of  you that have one coming to you with the price with S & H.  You can pay by PayPal, check or cash but not a credit card.

Once we all get them, I’ll have a class on how to use it and we’ll get to learn all the tips and tricks of it together.

New Website Promotion


Remember that every time you visit my website and leave me a comment or send me a message by the Contact Me button, you will be entered to win $15 worth of Free product from me.

For each separate time you visit my site = 1 entry

For each separate time you visit my site AND leave a comment = 2 entries

For each separate time you visit my site AND leave a comment AND order = 3 entries

Drawing will take place on Saturday, February 17, 2018!


Say What? What is a Stamp-a-ma-jig?

How to use your Stamp-a-ma-jig
 
What exactly is a Stamp-a-ma-jig anyway? I used to have one a long time ago when I first started stamping, about 23 years ago.  I loved it then and I think over the years I’ve misplaced it.  But as I’m getting just a little older for some reason I can’t seem to be able to line up my stamps as well as I used to.
 
Well Stampin’ Up! has carried this adorable, affordable and easy to use little tool called the Stamp-a-ma-jig.  It’s a stamp positioner and it’s made especially for perfectly aligning your stamps when you’re masking or wanting to add stems to flowers, antennae to insects or anything that you have 2 stamps for and want to make sure they line up just perfect.
 
For example I made this cute card with butterflies on it.  The little tiny antennae needed to be placed just perfectly on the small stamp.  Most people would get frustrated with such a small placement and since I was using a wood set (which I get if I have a choice) I couldn’t be sure it would line up perfectly.
 
I used my Stamp-a-ma-jig and viola it was perfect!


Gift Packaging


Remember to click “Annabelle’s Stampin’ Studio” in this email to view the full Blog


Easy

Gift Packaging

Have you ever had your gift all ready to go but realize you don’t have the correct size box or bag to put it in? Or it’s a totally special gift and you’d like the packaging to be super special as well?  Maybe something unique not the same old same old bag or box?

To give you some ideas I’m starting a short series on Gift Packaging.  The two videos in this post will be on gift boxes. Next week I’ll show you how to make gift bags out of DSP with and without our Gift Box maker.  Again the gift bags will be very customizable in colors and sizes.

Stampin’ Up! put this video out last Fall using holiday Designer Series Paper (DSP), but of course you can use any of our 12 x 12 DSP or cardstock.  We have 50 colors of cardstock and a large variety of DSP from which to choose.  Take a look at this easy video and you’ll never want to spend money on a plain box or gift wrap again!

Make sure you watch the entire video because she shows how to make custom size boxes to fit your packages perfectly!  AND it’s so easy!  


A special thanks to Brenna Baumy for voting for gift packaging to be featured in my Blog series. Also a huge Congratulations to Brenna for her new little angel Stella!


CUTE and EASY
DSP
Mini Box
(because good things come in small packages)
 
Here’s another super easy box that I thought you might enjoy making.  It’s really simple and very fast to make. I love using Designer Series Paper (DSP) to make this box but if you’d like you can use cardstock.  I did find that using cardstock makes a nice firm box, but it is a little harder to work with but very doable. At any rate, use what you like and what works best for your gift. The size for the top of the box in my video is 8-1/2″ x 8-1/2″. The bottom of the box is 8 x 8.  That is the trick to any size box that you want to make. The top always has to be 1/2″ bigger than the base or bottom of the box.  So go for it and make the size you need.  Hope you like it.
Stay tuned for next week’s post for some more great gift packaging ideas.  As promised I will show you how to make gift boxes and bags with our Gift Box Maker and or Gift Bag maker.  I’ll also have a video from Stampin’ Up! on how to use the Window Box Thinlits.  We made those cute boxes at our last workshop.
 
Remember to leave me your comments below on how you liked the videos.  If you leave a comment by March 29 your name will be put in for a drawing for a special gift!


Don’t Forget: RSVP by March 16 to attend this months “March Madness” Workshop on March 18

Glamper Fire Circle


ENTER IF YOU DARE

How cute is this special Halloween pumpkin?  It’s was so fun to put together and super easy too.  Not a lot of work, but a whole lot of spooky!


Stamp Set:
 
Glamper Greetings
 
Supplies:
 
Plastic pumpkin
Halloween Nights DSP – For banners
Shredd
Light tea light candle
Halloween Nights Baker’s Twine – To hang banners
Black netting
Pumpkin Pie Glimmer paper – For the moon


Product List


WHAT’S GOING ON?
 
OCTOBER WORKSHOP: Saturday, OCTOBER 29, 2016 12 Noon to 4 p.m.


  • Check out the Paper Pumpkin monthly kit – subscribe today – click here: PAPER PUMPKIN
  • Click below to SHOP the 2016 HOLIDAY CATALOG:


http://su-media.s3.amazonaws.com/media/catalogs/2016%20Holiday%20Catalog/Holiday16_en-US.pdf

How easy is the Envelope Punch Board? Easy…..

Here is a great video showing you how to use the Envelope Punch Board.  I used the Envelope Punch Board to make the envelope for the Spooky Fun Card I made for Halloween.  You’ll see how easy it is to use to make custom envelopes.


Envelope Paper is thinner than cardstock and is made especially for making envelopes.  It’s easy to use and matches our cardstock and ink pads. Making an envelope to match your card really adds a special WOW factor to all your cards.
Product List


WHAT’S GOING ON?

OCTOBER WORKSHOP: Saturday, OCTOBER 29, 2016 12 Noon to 4 p.m.

  • Check out the Paper Pumpkin monthly kit – subscribe today – click here: PAPER PUMPKIN
  • Click below to SHOP the 2016 HOLIDAY CATALOG:
http://su-media.s3.amazonaws.com/media/catalogs/2016%20Holiday%20Catalog/Holiday16_en-US.pdf